
Getting Started with Workflow Automation
This feature not only replaces and improves the old Notifications extension, but it also helps to replace your old scripts with a simple and effective solution for which you do not need any programmer but can do on your own.
In the Workflow Automation, you will work with two terms, and that is the "trigger" (the record is changed, deleted, exact date...) which will call a certain "action" (sending notification by email, creating a report, sending webhook action...).
Let's take a look at it together!
Use cases of Workflow Automation
In what specific cases can Workflow Automation help you?
- Workflow for approval processes (for example: approval of orders, received or issued invoices)
- Assigning tasks to individual employees
- Automatic locking of a record after a certain state change (e.g. contract or invoicing closure)
- Moving a candidate from the selection procedure to the staff,
moving a business opportunity into a contract - Security incident reporting
- Update your records at the certain time period
And many others...
Repeatable - please use with caution. The workflow must be built to run repeatedly without data corruption (e.g. avoid creating duplicities, detect if an operation has already run, etc.).
How to use it?
- Download the extension "Workflow Automation" into your application
- Select the option "Add new record"
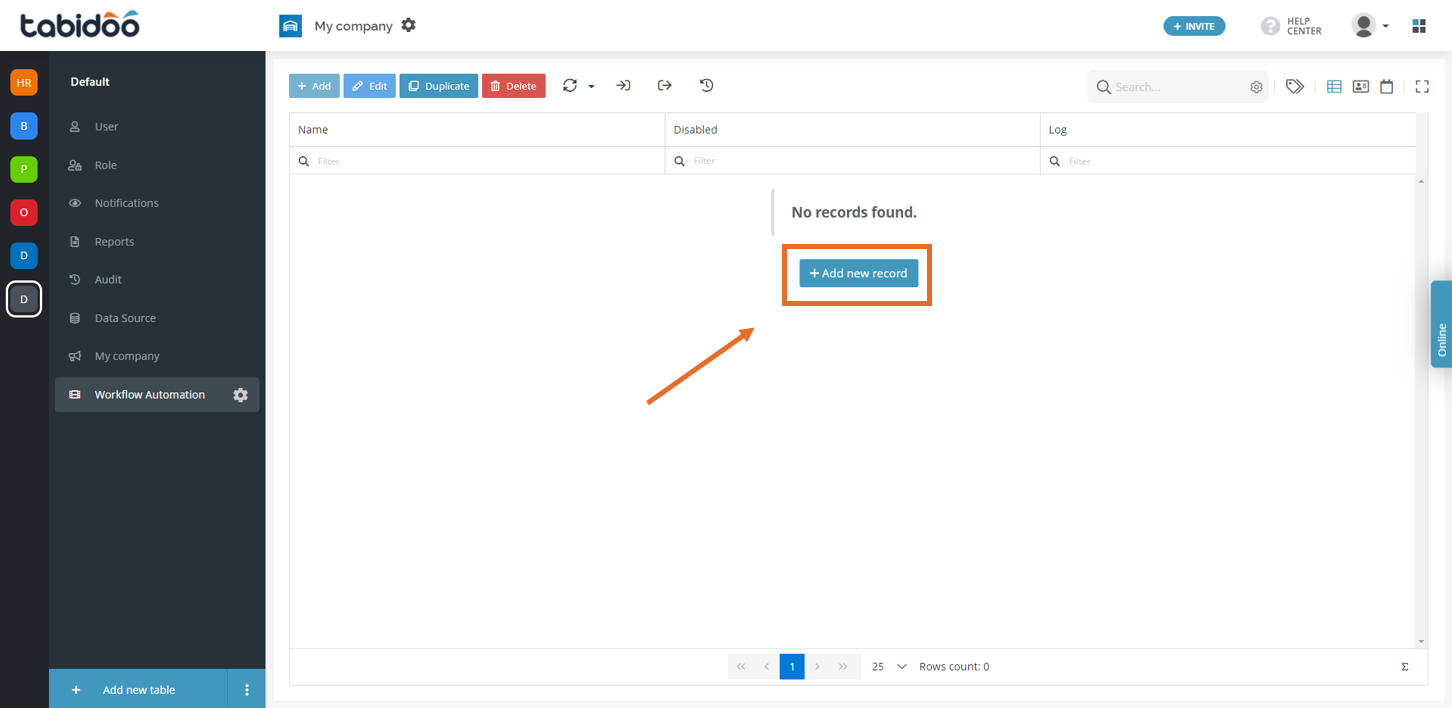
Add a new record and start using Workflow Automation
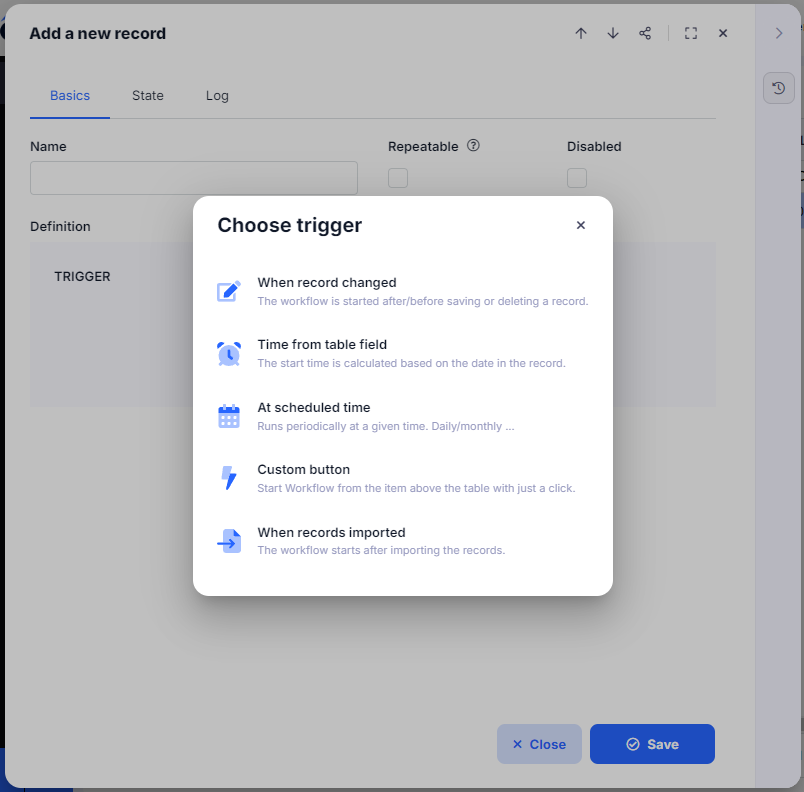
- Now it is necessary to select which event will start the workflow, as we mentioned earlier, we will call it a "trigger".
Workflow Triggers
When the record changed
Do want to receive a notification/run script or anything else, when certain records are created, changed, or deleted? Choose the source table and select any condition mentioned.
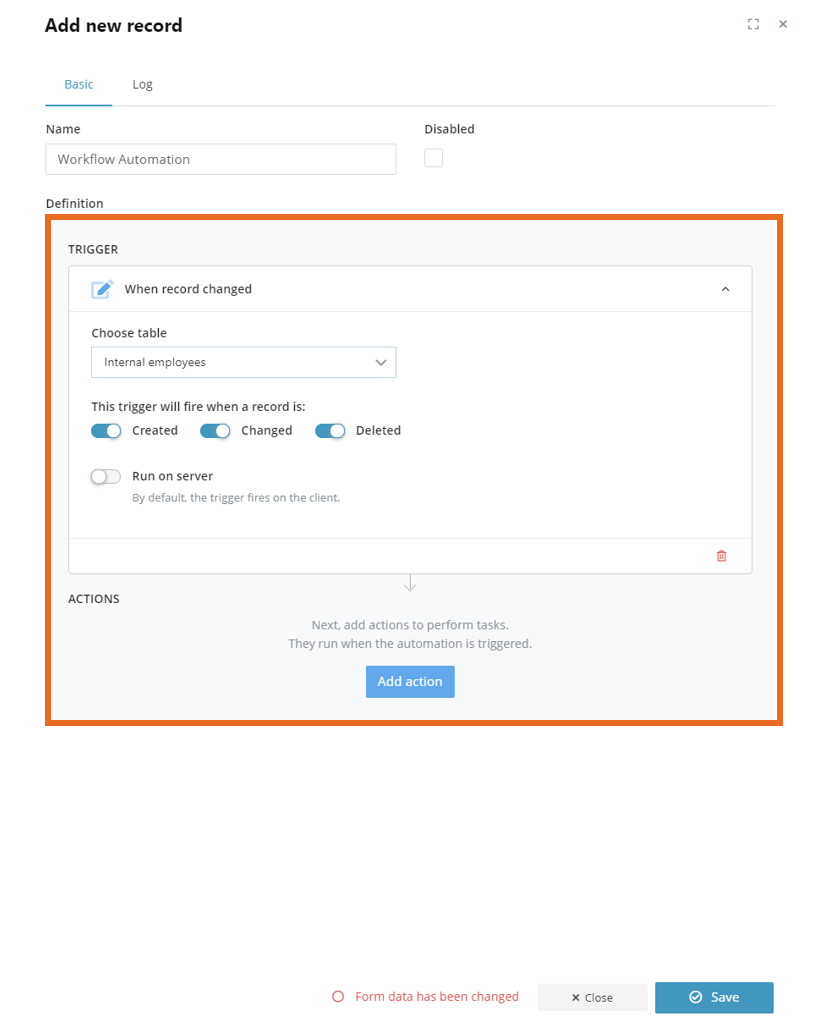
How to set up the trigger - When the record changed
Time from table field
You use this trigger when you want to call an action before or after any important date you keep in your table (for example you want to receive the notification a week before an invoice is due)
In order to set up this trigger, you must choose the source table with the date field and timing (x minutes/hours/days/months before or after any selected date)
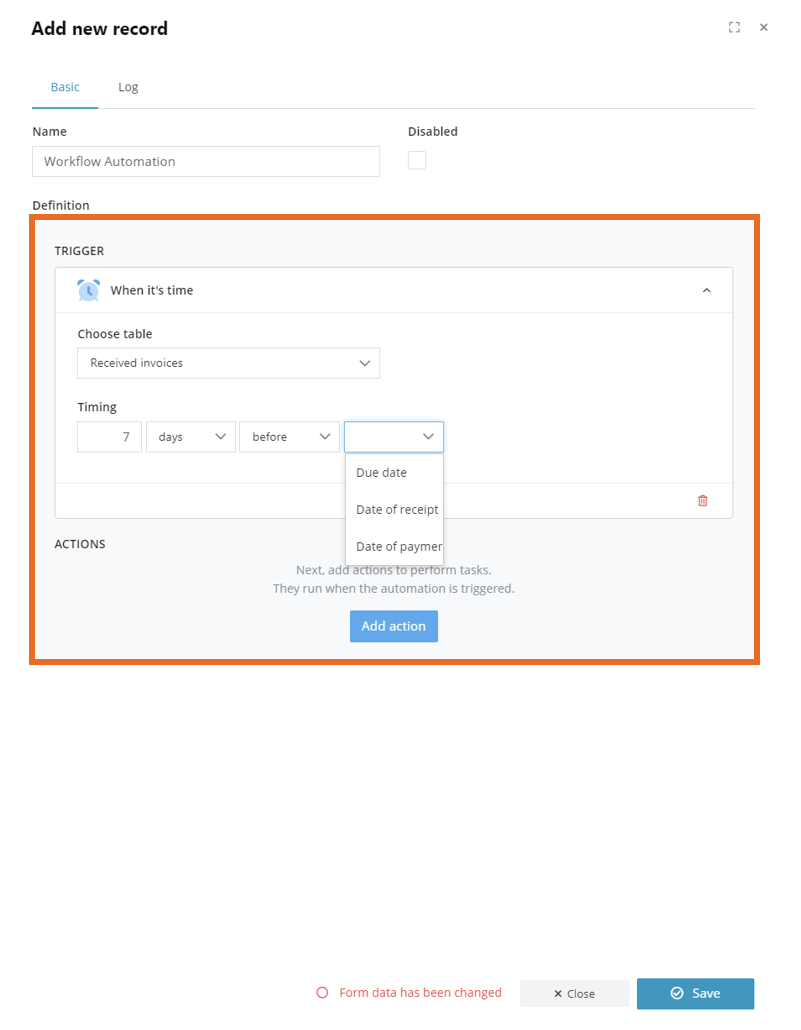
How to set up the trigger - When it's time
At the scheduled time
You use this trigger when you want to call the action at the scheduled time period - Immediately, Daily, Weekly, or Monthly (for example you want an invoice to be automatically sent to the customer each month for services rendered)
In order to set up this trigger, you must choose the time period and the exact day and time for the execution.
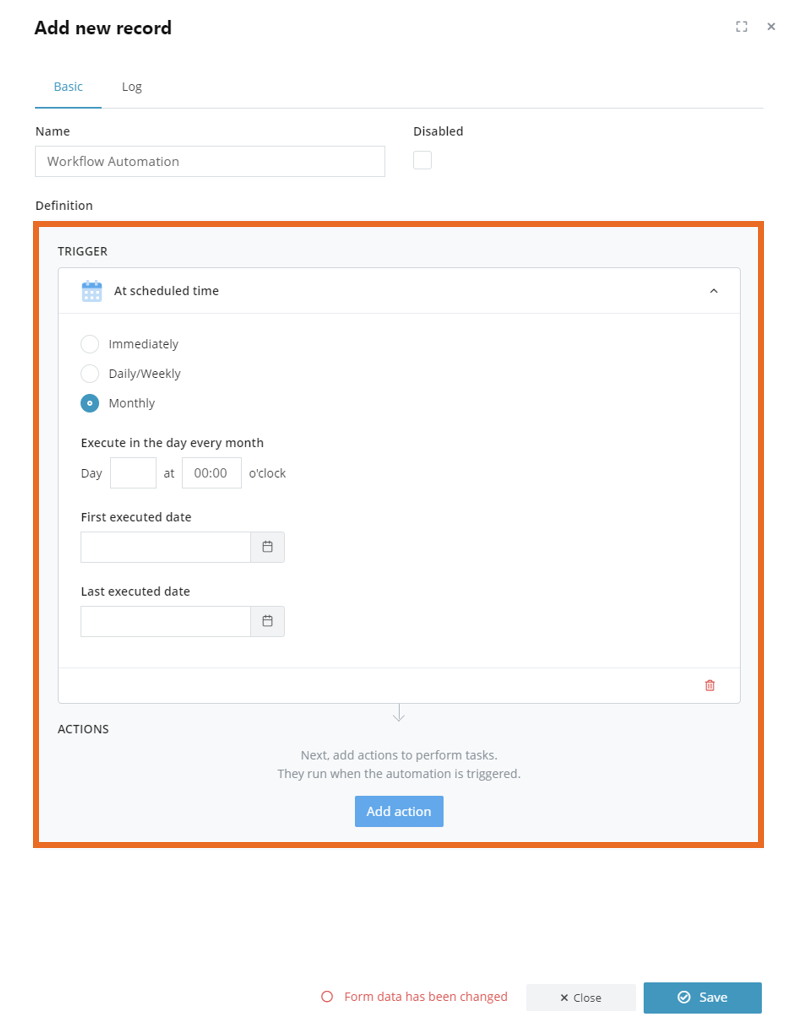
How to set up the trigger - When it's time
- Now it is time to set up the action by clicking on the option "Add action" under the trigger settings.
Custom button
The new Custom Button trigger starts your workflow with just a click, directly from any table. You can name the button as you wish and place it above any table in your application.
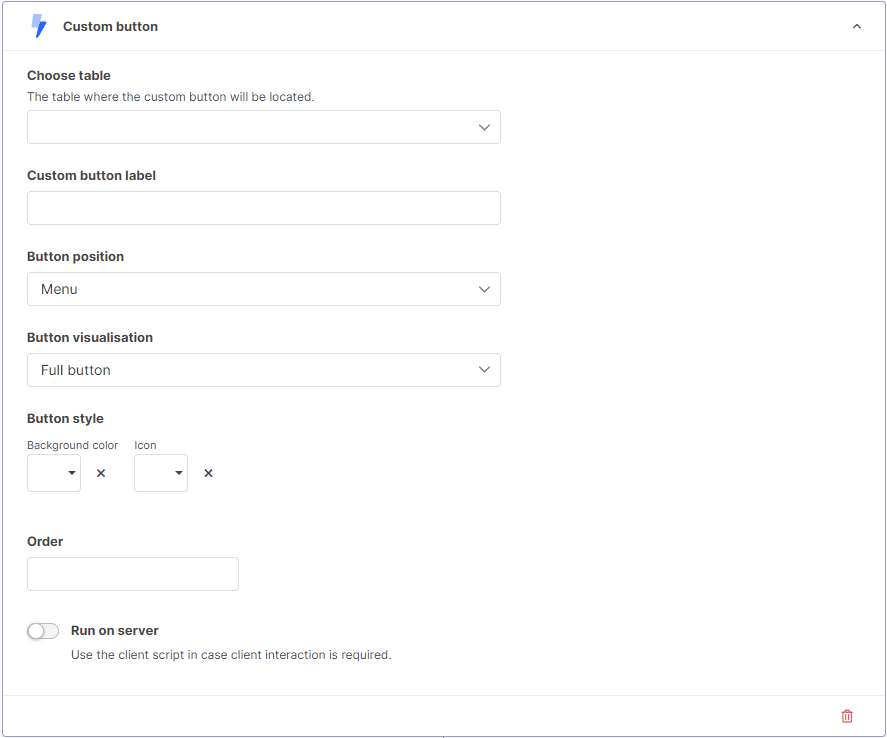
You can choose Button position (Menu or Popup) and add Icon. In Menu case you can choose Button visualisation (Full button or Just the Icon) and Background color too.
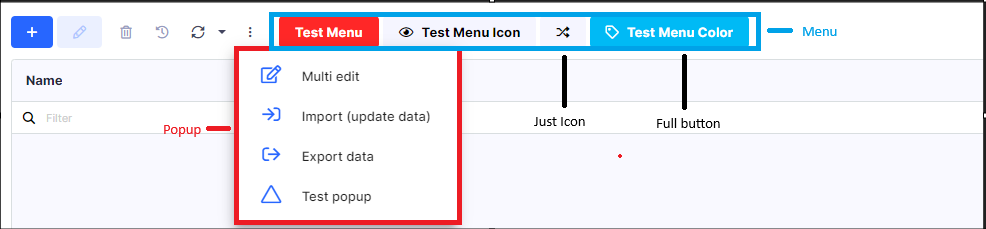
Position and visualisaton in table
Workflow Actions
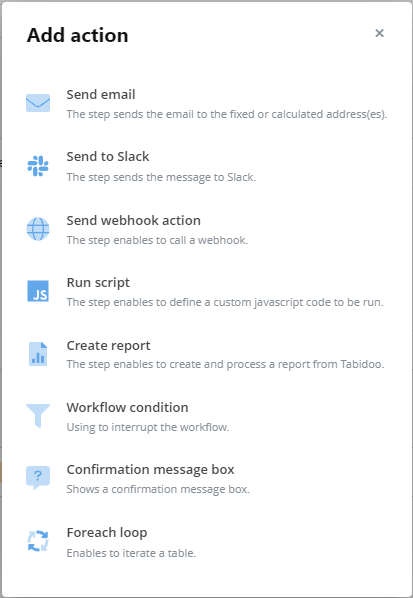
Send email
Do you want to send a notification on email after a certain trigger?
Follow the simple steps below.
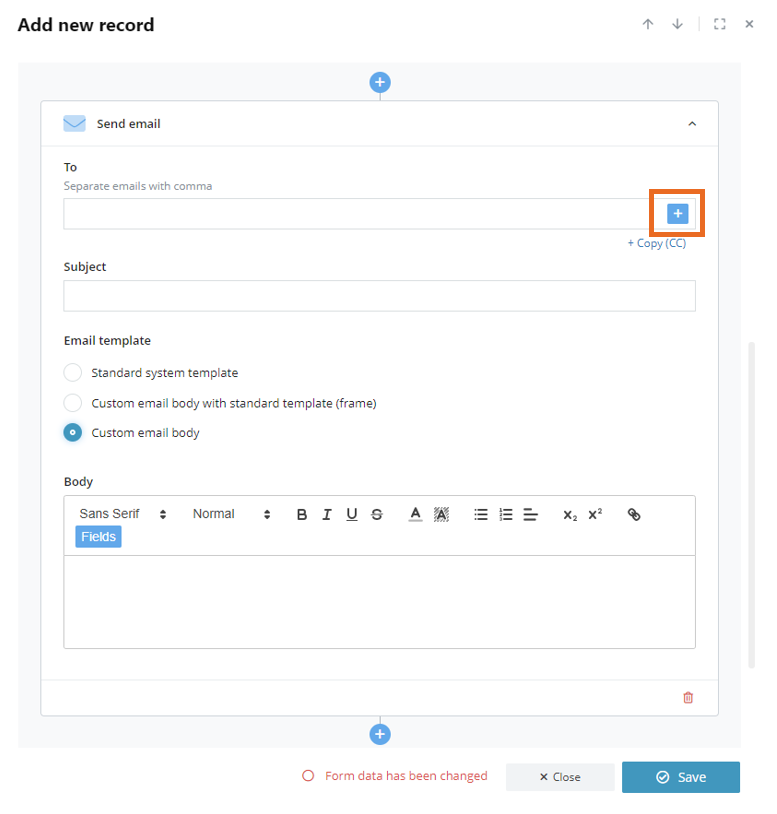
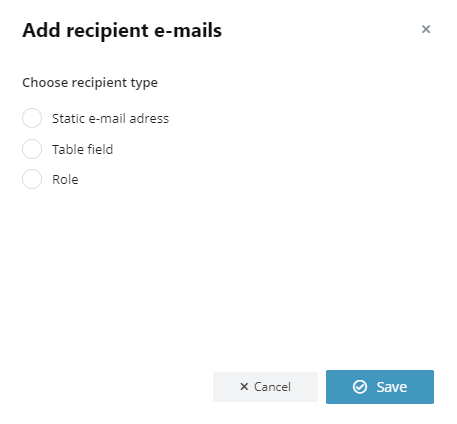
Add recipient e-mails for the notification
- Enter an email address for the notification to the field "To". By clicking on the "+" button, you can enter:
- the static email address
- the email address from a certain field in your application
- email of the users within the Role you select.
Add recipient e-mails menu
Under the "+" button you can insert an email to the copy/blind copy by clicking on "+Copy (CC)".
- Enter any subject to the "Subject" field.
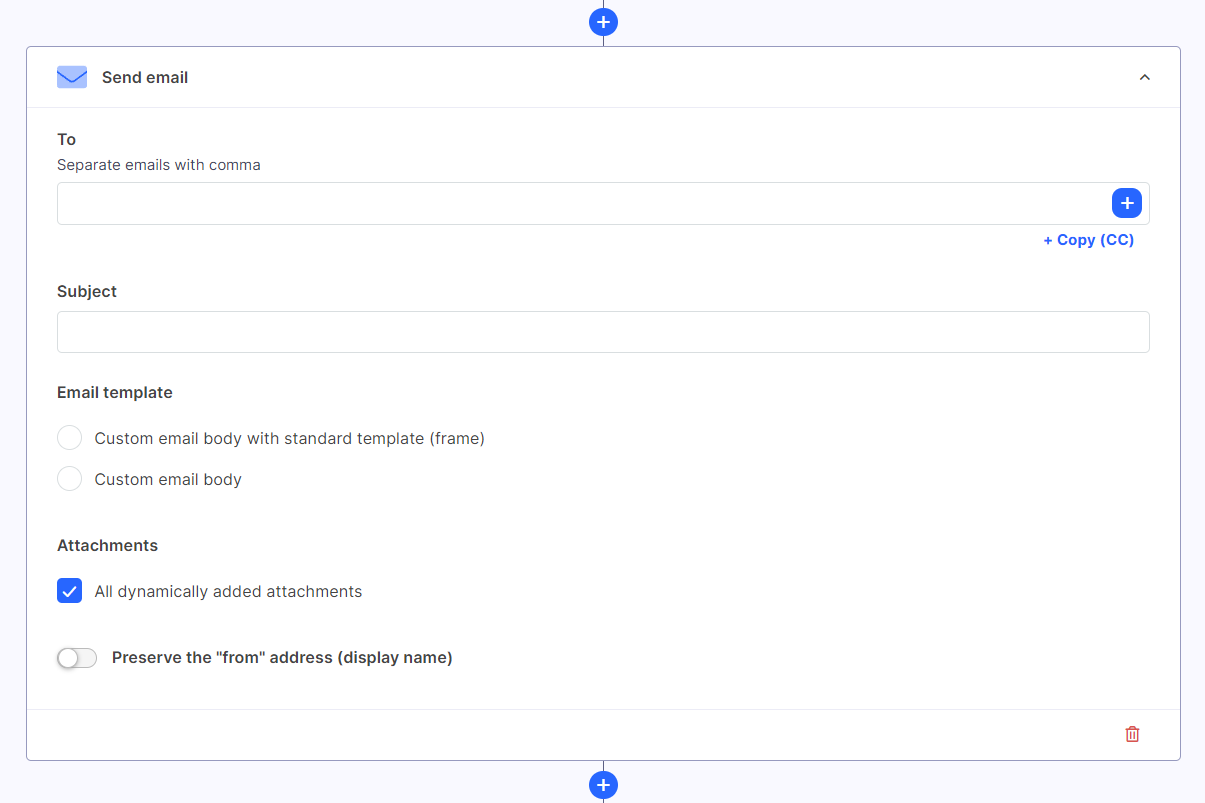
- Select the email template, which can be:
- Standard system template
- Custom email body with the standard template (frame)
- Custom email body (classic email body without Tabidoo frame)

Standard system template in the notification email

Custom email body with the standard template (frame) in the notification email
- Customize the email body - enter any text that can be easily edited by our designer which enables you to:
- Edit the text - change the font type, size, color...
- Insert link
- Insert fields from tables by clicking on the "Fields" button
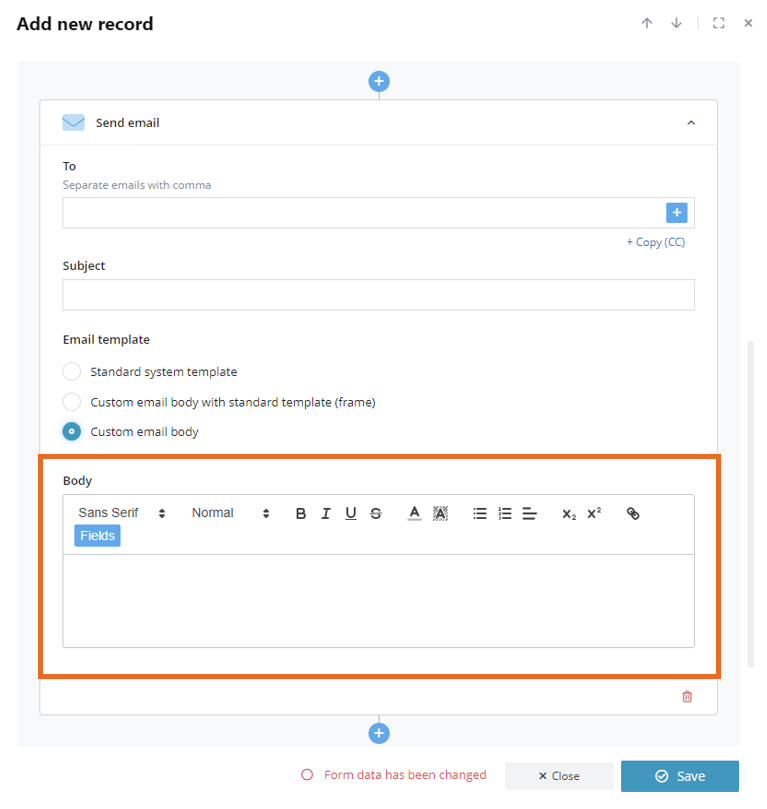
Customize the email body
How to dynamically attach an attachment to an email
Follow these steps:
- in the Run script step before the Send email step use the function
doo.workflow.attachment.addDynamicAttachment(see Intellisense hints) - you can add any file(s) converted to base64 or you can add an attachment(s) stored in Tabidoo (you must know the internal table name and fileId of the file and you must have access to this file)
- then you can attach this file(s) to an email in the Send email step
- dynamic attachments are stored in
the doo.workflow.runningDataobject - you can remove attachments by calling
doo.workflow.attachment.removeDynamicAttachmentordoo.workflow.attachment.clearAllDynamicAttachmentsbefore adding attachments (see Intellisense hints) - pay attention to the Foreach loop step - make sure all previous attachments have been removed before sending the next email (dynamic attachments are automatically removed after sending in the Send Email step - if they are marked for sending, but rather call
doo.workflow.attachment.clearAllDynamicAttachmentsbefore starting to add a dynamic attachment in each iteration of the Foreach loop)
Advanced TIP. In the static email it is possible to use a JavaScript variable calculated before. It should contains an array of strings (emails), one string or string with emails separated by semicolon. The variable must be in doo.workflow.runningData object. e, g, doo.workflow.runningData.customers. Just set that in the previous step and put it into static email field.
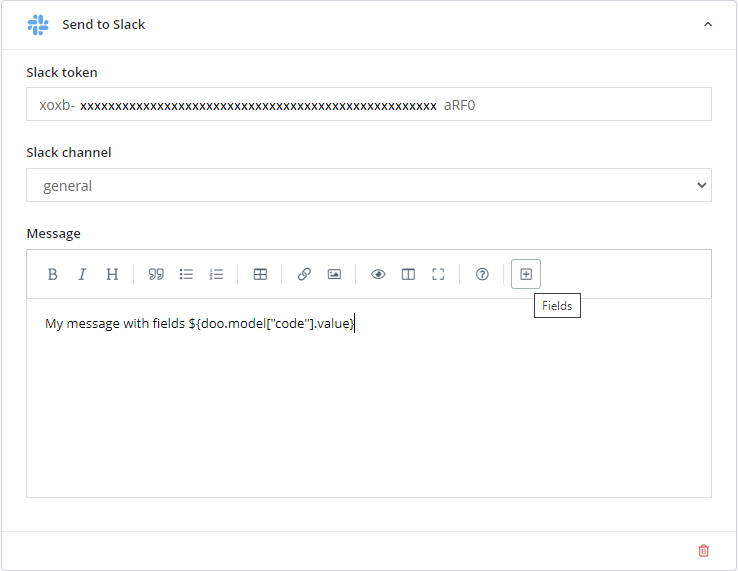
Send to Slack
Similar to Send email action, this action can send a message after record changed, or any other trigger.
Please, make sure you have a correct token and valid access for reading channels before you use the action.
After you type a token to the field, you can select the channel from the list.
The message to Slack supports simple formatting. You can include fields from the record to the message - the same way as Email action.
Send to Slack action form
Send webhook action
The step enables you to call a webhook.
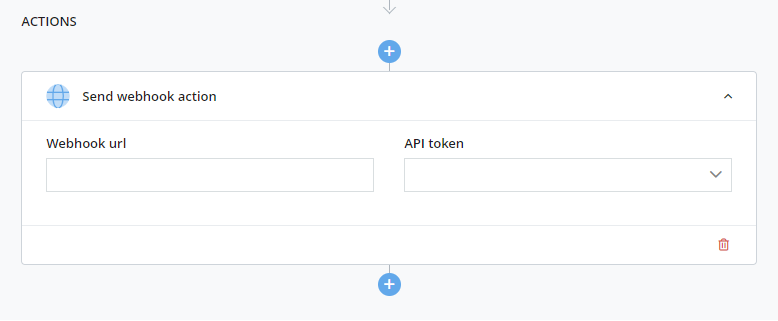
Send webhook action using Workflow Automation
- Simply enter the webhook URL or API token
Run script
This action enables you to define a custom JavaScript code to be run. Do you want to make sure your script is valid? Click on the option "Validate script during typing".
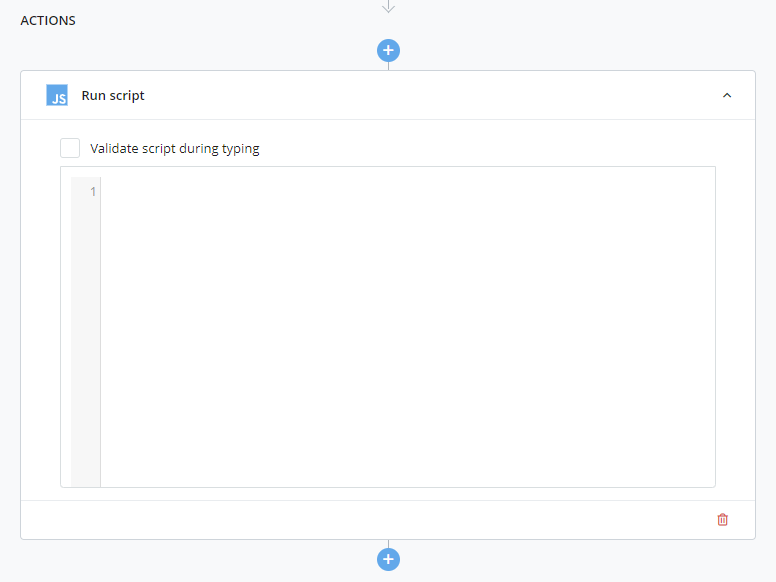
Run script in Workflow Automation
Create a report
This step enables you to create and process a report from Tabidoo.
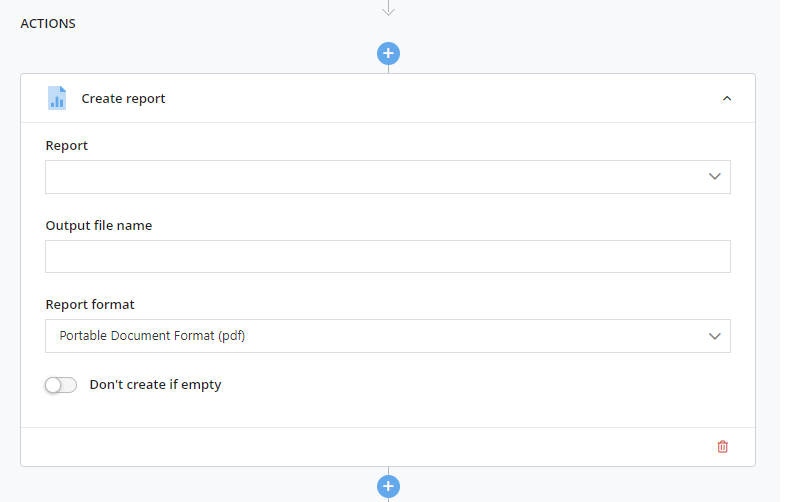
Create and process reports in Workflow Automation
- Select source report (For more information about reporting, click HERE)
- Enter the output file name
- Select the report format from the following:
- Portable Document Format (.pdf)
- HyperText Markup Language (.html)
- Microsoft Word (2007)
- Microsoft Excel (2007)
- Open Document Text (.odt)
- Open Document Spreadsheet (.ods)
- Comma Separated Values (.csv)
How to attach the report to the notification email
Follow these steps:
- Firstly, add the "Create report" action and select the source report
- Add the second action "Send email" by clicking on the "+" button and selecting the report from the "attachments".

How to attach the report to the notification email
Load external data
This step allows load data from Tabidoo table or external data storage into a variable. That can be used for data import step or in JavaScript later.
The first thing to do is to select the Data source type. Depending on the type, different functionality follows:
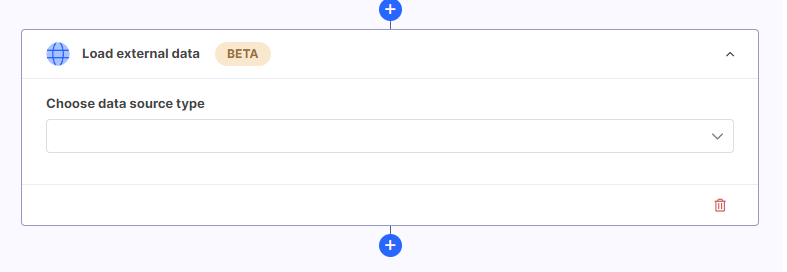
Data source type
Data Source Types
Tabidoo Table
- selection of application and table
- with the possibility of entering a filter
- renaming the data source
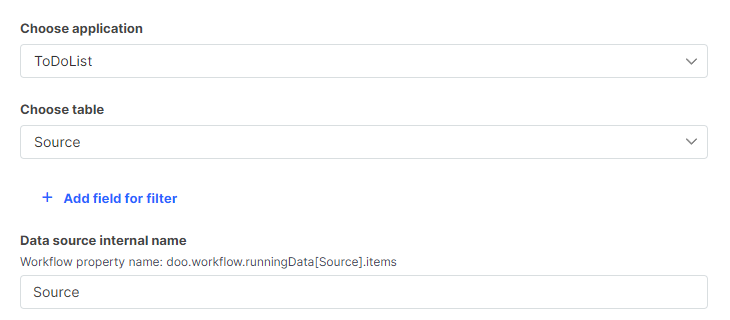
Controls for Tabidoo table
SQL
- naming the data source
- server name, database and credentials to create a sql connection string
- choosing to load data from a stored procedure or table
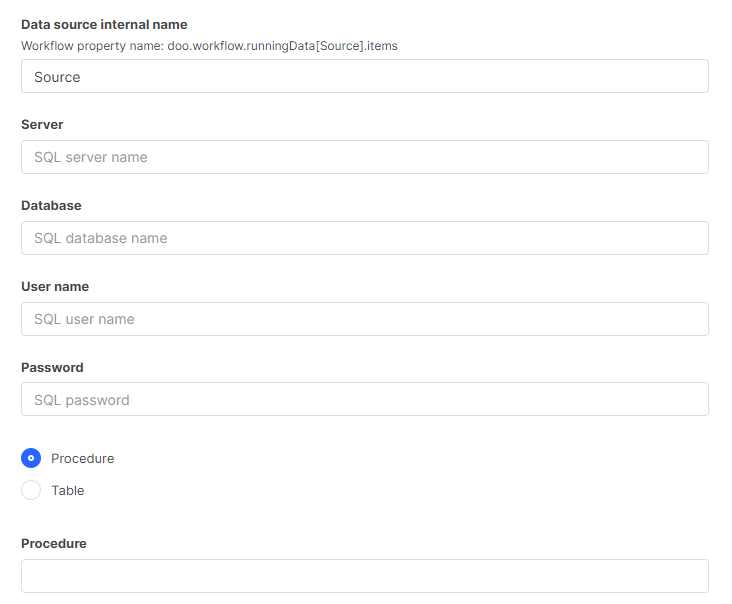
Controls for SQL
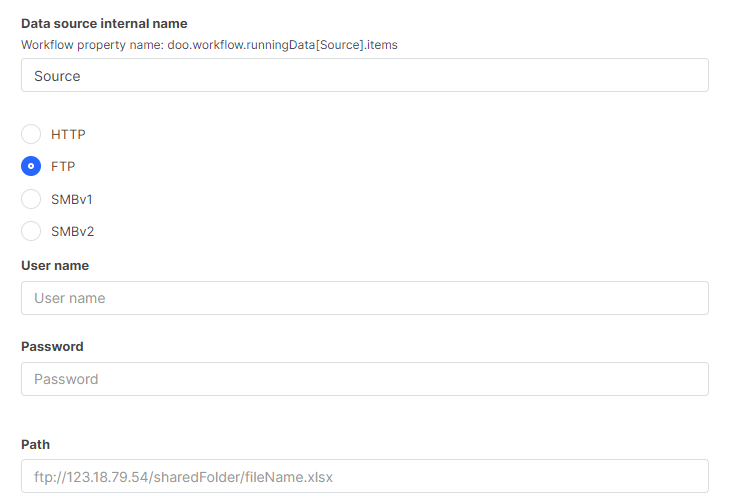
Excel, CSV, JSON
- naming the data source
- choice of loading data from HTTP, FTP, SMB1 or SMB2
- the Path of the selected server must be filled in, including the file name
- credentials must be filled in for FTP, SMB1 and SMB2
- Headers can be added for HTTP
Controls for FTP, SMB1 or SMB2
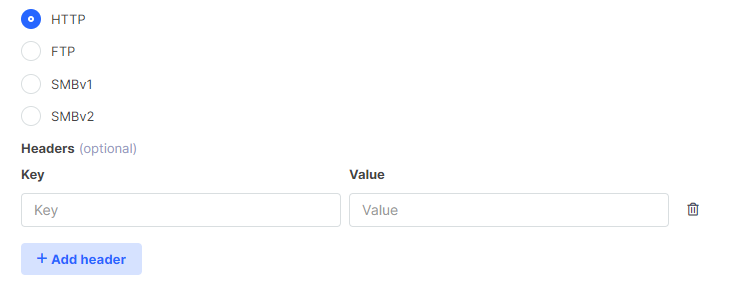
Add header for HTTP
Under Data source internal name text shows where the loaded data is stored in case of working with the data in JavaScript. A properties item is an array of objects with properties that correspond to the columns from the loaded file.

Property with loaded data
Map fields and save table
This step allows map columns and save data to Tabidoo table. You have to pick data source from one of previous Load external data step and destination table. You can choose import strategy, just add new record, just update record or simply append all data. You can switch off saving audit. Do not forget to load the structure to se the mapping part.
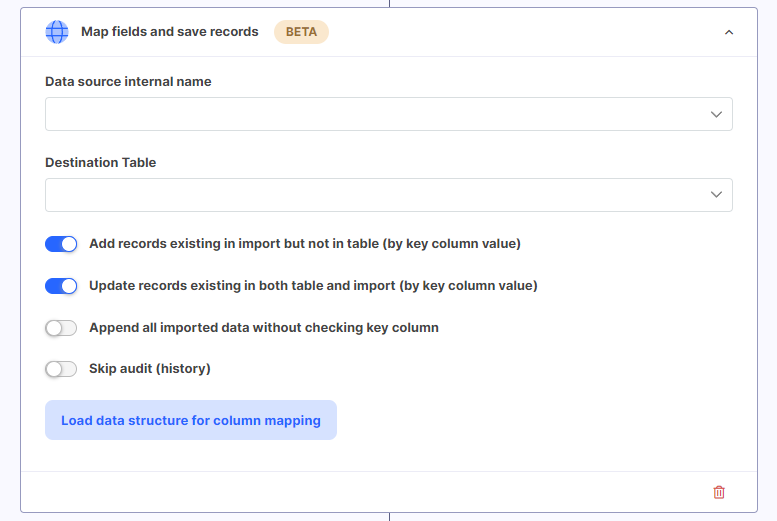
Map fields and save data.
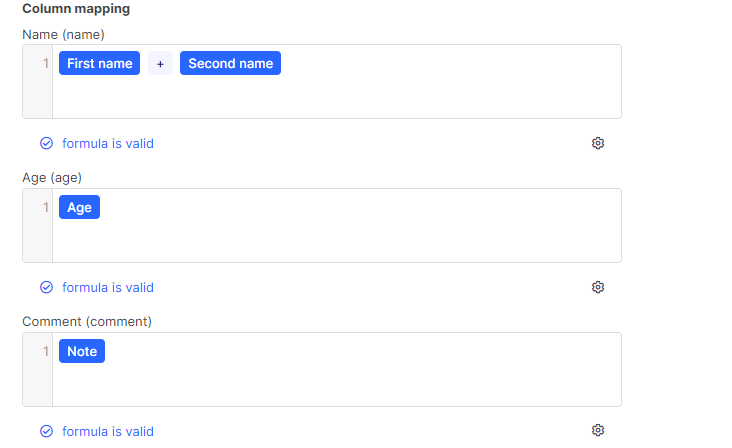
After filling these items, you need to map the columns from the source to the destination table.
Column mapping
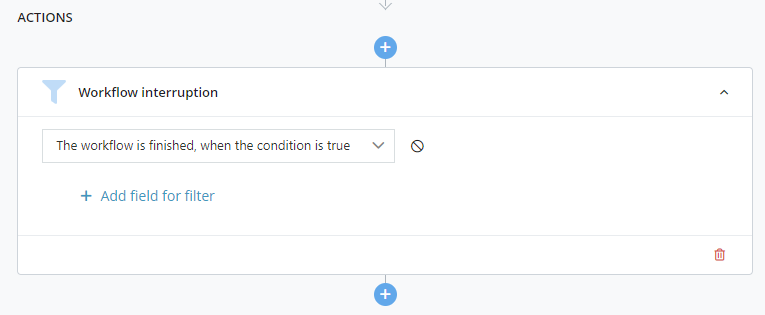
Workflow Interruption
If you want to enter any condition under which the workflow should be finished or the other way round, select this action.
Workflow interruption action
- Choose whether the condition will stop or start the workflow, select:
- The workflow is finished, when the condition is true
- The workflow continues, when the condition is true
- Add a field for the condition by clicking on "+Add field for filter"
An example:
I want to receive a notification email when the record of a certain table includes the dropdown value “Done”.
In the workflow interruption select the following - “The workflow continues, when the condition is true” and add a field for filter with the value “Done”.
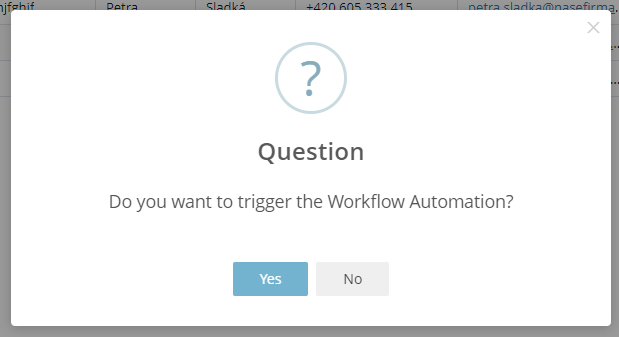
Confirmation message box
This action is especially useful with the trigger Custom button. It can trigger any message after the button is pressed.
You are free to enter any text message and define the message box behaviour.
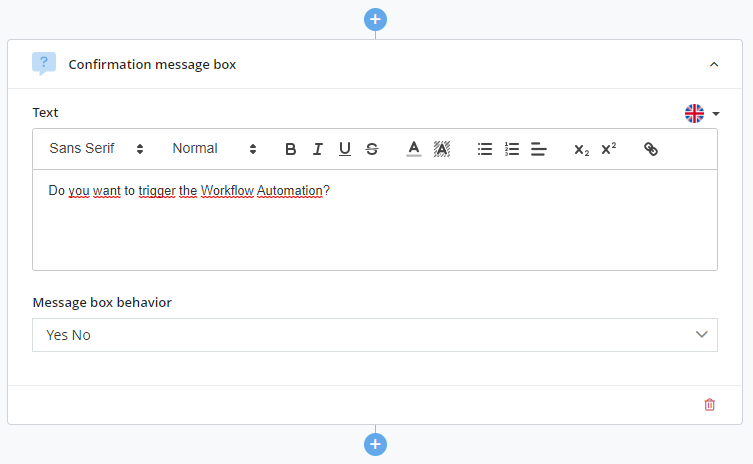
Afterwards, the following message box will appear after triggering the workflow automation:
Foreach loop
This is a pretty special action. It is about workflow flow. It enables you to run nested workflow for records from a table.
Use with filters. Otherwise the workflow iterates the whole table and you run out of API calls limit very quickly.
If the action is used together with the Custom button, the workflow is performed for all selected table records at once.
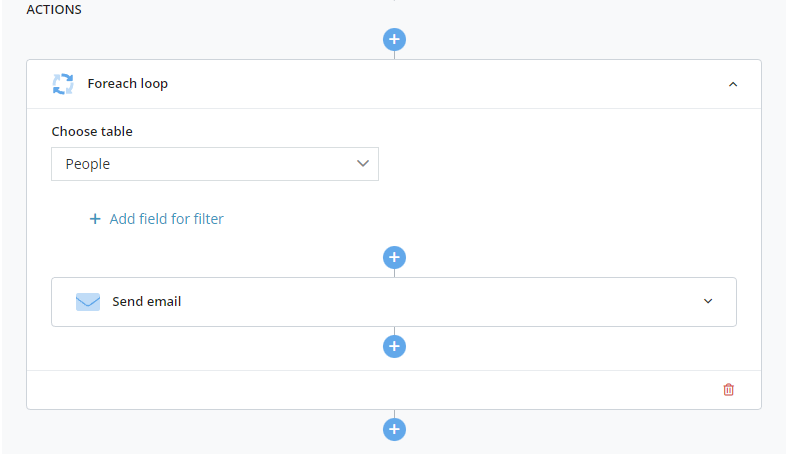
Foreach action screen
How to disable the workflow?
If you want to just pause the workflow, select the option "Disabled" which is situated in the workflow settings next to the workflow name.
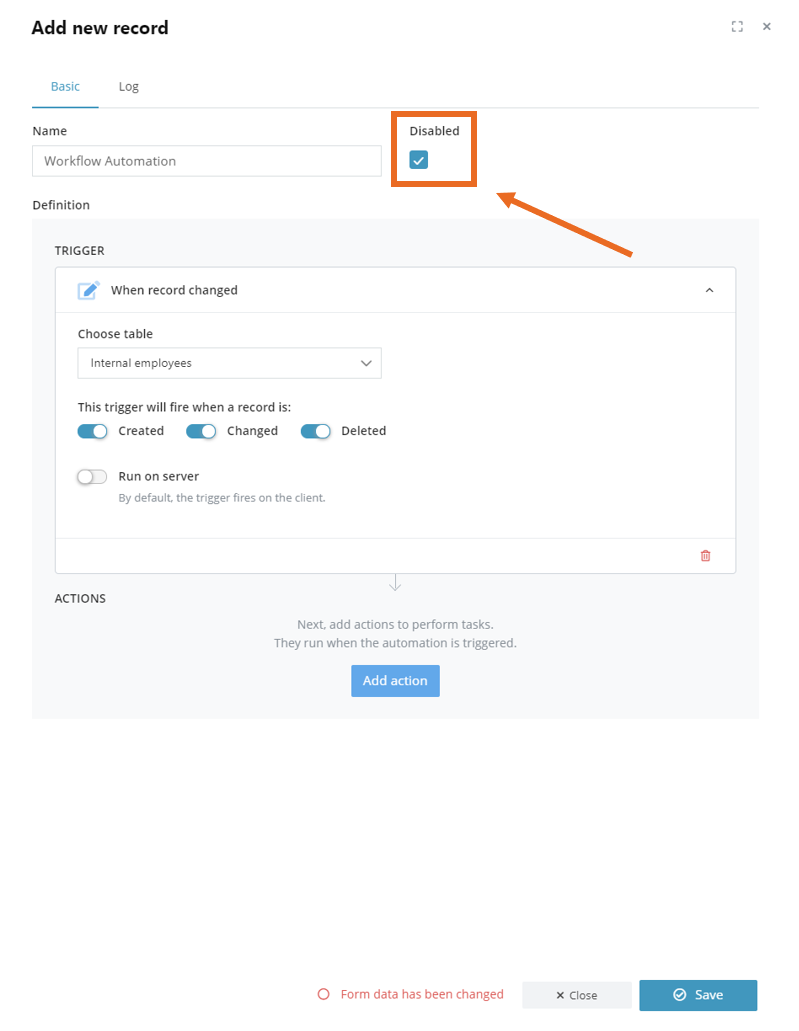
Disable your Workflow easily
In case you want to stop the workflow permanently, simply delete it as you are used with any other record in Tabidoo.