Webhook
The Webhook trigger enables you to call a workflow from external systems by invoking a webhook URL. This trigger is ideal for integrating third-party services and automating processes based on external events.
Configuration Options
Webhook URL
- When you create a Webhook trigger, the system generates a unique URL.
- The URL can be copied from the field labeled: "Use this link after save:".
- This URL can be used to trigger the workflow by sending a request to it.
Run As
- Define the context under which the trigger will run:
- Run under Me (Current User): The action will run under your user rights.
- Run under Logged-in User: The action will run in context of the user, which started the action.
- Run under API Token: Best solution. Most secure in case you choose a Shared API token!
How to Send Data to a Webhook
- The Webhook URL supports sending data in the request body using the JSON format.
- The data sent in the request body will be available in the workflow scripting (in the workflow context) under the property
doo.workflow.payloadRequest.
Example of Using doo.workflow.payloadRequest in Tabidoo Scripting: If the following JSON object is sent to the webhook URL:
{
   "firstname": "Jack"
}
You can access it in the scripting as follows:
const firstname = doo.workflow.payloadRequest.firstname;
console.log("Received firstname:", firstname);
Example Usage
To trigger the Webhook and send data, you can use the following URL command:
curl -X POST <YOUR_WEBHOOK_URL> \
 -H "Content-Type: application/json" \
 -H "Authorization: Bearer <YOUR_API_TOKEN>" \
 -d '{ "firstname": "Jack" }'
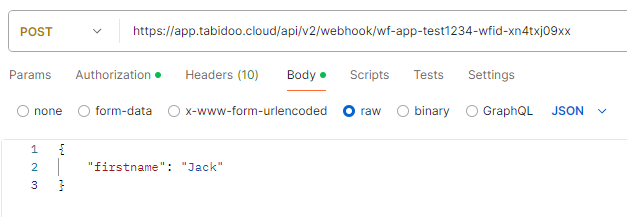
or using e.g. Postman:

Using webhooks requires a personal API token, which you can generate in your Tabidoo user profile. Include the token in the request header as Authorization: Bearer <YOUR_API_TOKEN>.
Use Case Examples
- Synchronize External Systems: Trigger workflows when data changes in a third-party CRM.
- Process Incoming Data: Receive and process incoming data from an external IoT device.
- Automate Notifications: Send notifications based on external form submissions.
The Webhook trigger provides a flexible way to integrate Tabidoo with other systems, enabling powerful automation capabilities.
